Increasing or decreasing frame exposure in Aseprite to time an animation is so cumbersome that I created an account just to make a feature request. ![]() This is such a basic feature in every other animation and compositing program I’ve used (Flash, Animate, TVPaint, Harmony, Dragonframe, AfterEffects, etc.) that it’s extremely infuriating that Aseprite doesn’t have it, even though the timeline view is x-sheet-like. If I’m being honest, it’s one of the biggest reasons why I avoid using Aseprite unless I absolutely need to and avoid recommending it to people (especially people who have a traditional animation background).
This is such a basic feature in every other animation and compositing program I’ve used (Flash, Animate, TVPaint, Harmony, Dragonframe, AfterEffects, etc.) that it’s extremely infuriating that Aseprite doesn’t have it, even though the timeline view is x-sheet-like. If I’m being honest, it’s one of the biggest reasons why I avoid using Aseprite unless I absolutely need to and avoid recommending it to people (especially people who have a traditional animation background).
- Ability to add exposure to a single frame, while “pushing” the subsequent frames in the same layer over. The other layers should NOT have a frame added.
In Aseprite terms, I believe this would entail moving all the cels after the selected cell over and then adding new linked cels into the empty space.
Here’s the “fastest” way I can do this in Aseprite currently… kind of. It isn’t ideal, and notice that it doesn’t “push” the frames over, so if I want to avoid overwriting those then I need to move them out of the way first (not shown in this gif). I don’t want to have to select EVERY frame and then move them over manually twice for all frames I want to retime! It’s too many button presses and if there are a lot of frames then this is very painful to do.

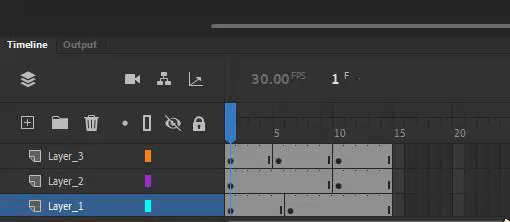
- Ability to add exposure to selected frames on multiple layers. Here we have the first linked cel on layer 3 and the second linked cel on layer 1 selected. Pressing the new frame hotkey adds 1 new linked cel to both of those frames, while pushing the subsequent frames on those layers over to the right.
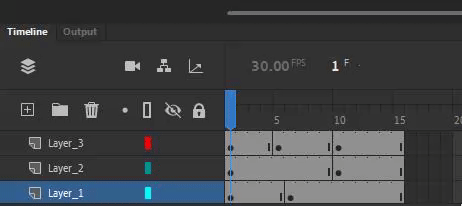
I don’t think there’s any way I can do this in Aseprite right now. I think I’d have to go layer by layer, individually moving every single frame. Ugh! It takes forever! Please end my pain!!
- “Add/remove n exposure to/from all frames” - add/subtract some integer “n” amount of linked frames to ALL frames in the animation. (So you could, for example, change your animation from being on 1’s to 2’s and then fill in more keys in areas where the animation is faster and requires being on 1’s.)
This is pretty much the equivalent of selecting all frames and doubling the amount of time of each frame (think using “Constant Frame Rate” and going from 100ms to 200ms), but visually represented on the timeline instead of being under the individual properties of a frame (so if you went from 100ms to 200ms where all frames are 100ms, you’d end up with two 100ms frames).