Hi all,
Yep, same here.
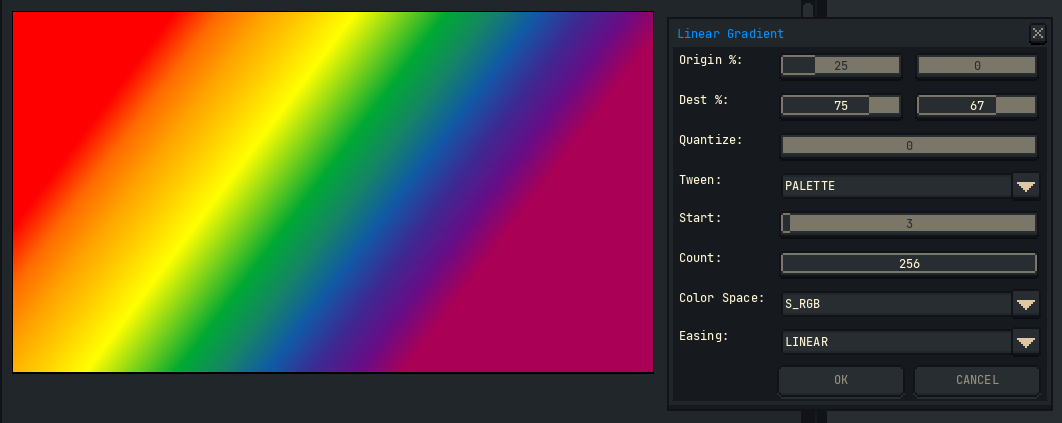
Re: specifying a point from a dialog. I’ve tried similar, except with percentages of the sprite’s width and height. I don’t find it as intuitive as the mouse-controlled built-in gradient.
An advantage of points in pixels over percentages is that you could expand a gradient’s origin and destination into coordinates beyond the sprite’s dimensions, e.g., from (-16, -16) to (48, 48) for a 32 x 32 sprite.
A disadvantage is entering inputs via keyboard. If you’ve ever typed a number, then left the dialog open, then pressed a tool shortcut without realizing what’s in focus, you see my point. (Although, I suppose sliders capture arrow keys as well.)
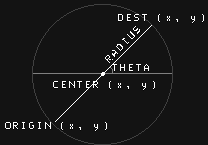
Another possibility is to use polar coordinates. Let the user define the center point (x, y), the angle of the gradient and the radius of origin and destination from the center. The dialog would convert polar to Cartesian. A disadvantage is that some users are used to clockwise rotation (positive y points down); others, counter-clockwise (positive y points up).
Or maybe consider the top-left and bottom-right of a selection’s bounds to define origin and destination. The selection contains method could mask off the gradient to a shape.
Lastly, a tangent: I encourage tackling the math. Not a math fan myself, but I’ve found that learning it gives you greater independence from any one API.
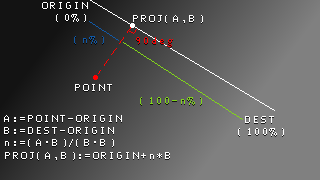
The key concept is the scalar projection of one vector onto the other. It may help to learn the dot product first. Vector projection is the method we’d use to visualize geometry, i.e., the point projected on the line seg. However, for a gradient, we only need a percentage to supply to a color mixing function.
I made the percentage, n, lower case to show that it’s a single number, not an (x, y) pair. What confused me when I first learned is that tutorials sometimes distinguished between a point and a vector, and at other times didn’t. In the above, A and B are vectors. Subtracting one point from another yields a vector; adding a vector to a point yields a point.
Depending on whether you clamp or modulo the percentage, the gradient could truncate at the end points, as above, or repeat in a cycle.
By not using the built-in gradient, you’d lose access to dithering effects. For me, the effects are less useful for gradients with multiple colors and gradients that mix in perceptual space… But I realize it’s a matter of taste.
Cheers,
Jeremy