Hi @D_W,
If it helps you to imagine that you’re looking down at a sphere’s North pole, I suggest comparing Aseprite’s normal map wheel with others online first. Maybe bring them in as a reference image or drag and drop two sprite tabs.
For example, this is an image looking down at 3 UV spheres that I made in Blender.
If the distribution of discrete swatches matters, icospheres or cube-spheres could be used instead.
I realize my eyedropper can’t be seen in the comparison below, so I encourage you to do your own comparison (using both smooth and discrete images).
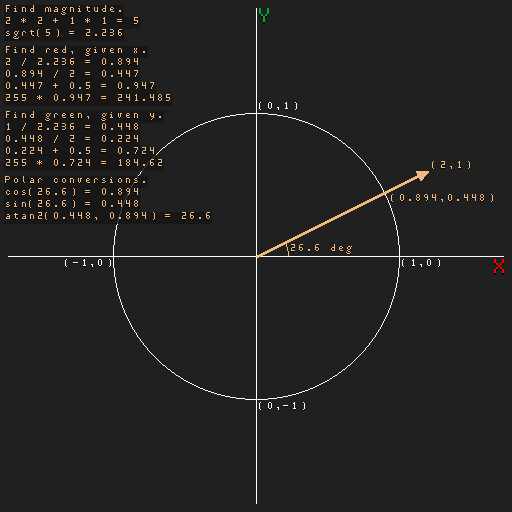
If knowing some of the math behind the colors would help, here’s a diagram simplified from 3D to 2D. This is for the vector (2, 1).
This should look familiar if you’ve taken a trigonometry class. A fuller 3D maths detail can be found in an entry on the spherical coordinate system. (3D coordinate systems vary across game engines and software; see the right-hand rule.)
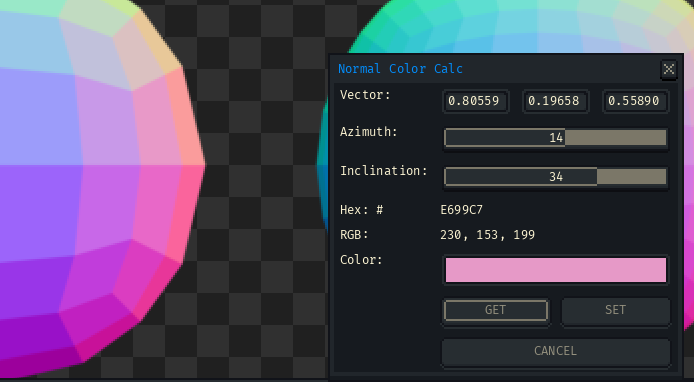
The math can be parlayed into a Lua color picker script. My preference would be to work in directions instead of trying to combine colors directly.
This script will calculate directions below an inclination of zero (at a normal sphere’s equator), though they are not used in normal maps.
local function fromSpherical(az, incl)
    local a = az * math.pi / 180.0
    local i = incl * math.pi / 180.0

    local cosAzim = math.cos(a)
    local sinAzim = math.sin(a)
    local cosIncl = math.cos(i)
    local sinIncl = math.sin(i)

    return cosIncl * cosAzim,
        cosIncl * sinAzim,
        sinIncl
end

local function toSpherical(x, y, z)
    local sqmag = x * x + y * y + z * z
    if sqmag > 0.0 then
        local azRad = math.atan(y, x)
        local azDeg = azRad * 180.0 / math.pi

        local inclRad = math.acos(z / math.sqrt(sqmag))
        local inclDeg = inclRad * 180.0 / math.pi
        inclDeg = 90.0 - inclDeg

        return azDeg, inclDeg
    else
        return 0.0, 90.0
    end
end

local function vecToColor(x, y, z)
    local sqMag = x * x + y * y + z * z
    if sqMag > 0.0 then
        local mag = math.sqrt(sqMag)

        local xn = x / mag
        local yn = y / mag
        local zn = z / mag

        local r01 = xn * 0.5 + 0.5
        local g01 = yn * 0.5 + 0.5
        local b01 = zn * 0.5 + 0.5

        local r255 = math.tointeger(0.5 + 255.0 * r01)
        local g255 = math.tointeger(0.5 + 255.0 * g01)
        local b255 = math.tointeger(0.5 + 255.0 * b01)

        return Color(r255, g255, b255, 255)
    else
        return Color(128, 128, 255, 255)
    end
end

local function updateWidgetClr(dialog, clr)
    dialog:modify {
        id = "normalColor",
        colors = { clr } }

    dialog:modify {
        id = "hexCode",
        text = string.format(
            "%06X",
            (clr.red << 0x10 |
            clr.green << 0x08 |
            clr.blue))
    }

    dialog:modify {
        id = "rgbLabel",
        text = string.format(
            "%d, %d, %d",
            clr.red,
            clr.green,
            clr.blue)
    }
end

local function updateWidgetCart(dialog)
    local args = dialog.data
    local x = args.x
    local y = args.y
    local z = args.z

    local a, i = toSpherical(x, y, z)
    if a < 0.0 then a = a - 0.5 end
    if a > 0.0 then a = a + 0.5 end
    if i < 0.0 then i = i - 0.5 end
    if i > 0.0 then i = i + 0.5 end

    dialog:modify {
        id = "azimuth",
        value = math.tointeger(a)
    }

    dialog:modify {
        id = "inclination",
        value = math.tointeger(i)
    }

    local clr = vecToColor(x, y, z)
    updateWidgetClr(dialog, clr)
end

local function updateWidgetSphere(dialog)
    local args = dialog.data
    local az = args.azimuth
    local incl = args.inclination
    local x, y, z = fromSpherical(az, incl)

    dialog:modify { id = "x", text = string.format("%.5f", x) }
    dialog:modify { id = "y", text = string.format("%.5f", y) }
    dialog:modify { id = "z", text = string.format("%.5f", z) }

    local clr = vecToColor(x, y, z)
    updateWidgetClr(dialog, clr)
end

local dlg = Dialog { title = "Normal Color Calc" }

dlg:newrow { always = false }

dlg:number {
    id = "x",
    label = "Vector:",
    text = string.format("%.5f", 0.0),
    decimals = 5,
    onchange = function()
        updateWidgetCart(dlg)
    end
}

dlg:number {
    id = "y",
    text = string.format("%.5f", 0.0),
    decimals = 5,
    onchange = function()
        updateWidgetCart(dlg)
    end
}

dlg:number {
    id = "z",
    text = string.format("%.5f", 1.0),
    decimals = 5,
    onchange = function()
        updateWidgetCart(dlg)
    end
}

dlg:newrow { always = false }

dlg:slider {
    id = "azimuth",
    label = "Azimuth:",
    min = -180,
    max = 180,
    value = 0,
    onchange = function()
        updateWidgetSphere(dlg)
    end
}

dlg:newrow { always = false }

dlg:slider {
    id = "inclination",
    label = "Inclination:",
    min = -90,
    max = 90,
    value = 90,
    onchange = function()
        updateWidgetSphere(dlg)
    end
}

dlg:newrow { always = false }

dlg: label {
    id = "hexCode",
    label = "Hex: #",
    text = "8080FF"
}

dlg:newrow { always = false }

dlg: label {
    id = "rgbLabel",
    label = "RGB:",
    text = "128, 128, 255"
}

dlg:newrow { always = false }

dlg:shades {
    id = "normalColor",
    label = "Color:",
    mode = "sort",
    colors = { Color(128, 128, 255, 255) }
}

dlg:newrow { always = false }

dlg:button {
    id = "getColor",
    text = "&GET",
    onclick = function()
        local clr = app.fgColor

        local r255 = clr.red
        local g255 = clr.green
        local b255 = clr.blue

        if clr.alpha < 1 then
            r255 = 128
            g255 = 128
            b255 = 255
        end

        local r01 = r255 / 255.0
        local g01 = g255 / 255.0
        local b01 = b255 / 255.0

        local x = r01 + r01 - 1.0
        local y = g01 + g01 - 1.0
        local z = b01 + b01 - 1.0

        local sqmag = x * x + y * y + z * z
        if sqmag > 0.0 then
            local xn = x
            local yn = y
            local zn = z

            local mag = math.sqrt(sqmag)
            xn = x / mag
            yn = y / mag
            zn = z / mag

            dlg:modify { id = "x", text = string.format("%.5f", xn) }
            dlg:modify { id = "y", text = string.format("%.5f", yn) }
            dlg:modify { id = "z", text = string.format("%.5f", zn) }

            local a, i = toSpherical(xn, yn, zn)
            if a < 0.0 then a = a - 0.5 end
            if a > 0.0 then a = a + 0.5 end
            if i < 0.0 then i = i - 0.5 end
            if i > 0.0 then i = i + 0.5 end

            dlg:modify {
                id = "azimuth",
                value = math.tointeger(a)
            }

            dlg:modify {
                id = "inclination",
                value = math.tointeger(i)
            }

            local nr01 = xn * 0.5 + 0.5
            local ng01 = yn * 0.5 + 0.5
            local nb01 = zn * 0.5 + 0.5

            local nr255 = math.tointeger(0.5 + 255.0 * nr01)
            local ng255 = math.tointeger(0.5 + 255.0 * ng01)
            local nb255 = math.tointeger(0.5 + 255.0 * nb01)

            dlg:modify {
                id = "normalColor",
                colors = { Color(nr255, ng255, nb255, 255) }
            }

            dlg:modify {
                id = "hexCode",
                text = string.format("%06X",
                    (nr255 << 0x10 |
                    ng255 << 0x08 |
                    nb255))
            }

            dlg:modify {
                id = "rgbLabel",
                text = string.format("%d, %d, %d",
                    nr255, ng255, nb255)
            }
        end
    end
}

dlg:button {
    id = "setColor",
    text = "&SET",
    onclick = function()
        local normalColors = dlg.data.normalColor
        if #normalColors > 0 then
            local normalColor = normalColors[1]
            app.fgColor = Color(
                normalColor.red,
                normalColor.green,
                normalColor.blue,
                255)
        end
    end
}

dlg:newrow { always = false }

dlg:button {
    id = "cancel",
    text = "&CANCEL",
    onclick = function()
        dlg:close()
    end
}

dlg:show { wait = false }
If nothing else, this could be a stepping stone to understand the workings of the previous script that you used.
Ultimately, some 3D tool – such as those suggested in the tutorial you linked – would be helpful, if only to serve as a pre-visualization step.
Cheers,
Jeremy