Hi @Romanenco,
Below is my opinion as someone who enjoys writing Aseprite scripts that deal with color. Apologies for the length. Welcome to the community!
Cheers,
Jeremy
I’d be in favor of UI elements to let filters target image shadows, midtones and highlights where it makes sense. I don’t know how that would cooperate with the current UI to target red, green, blue and alpha channels, though.
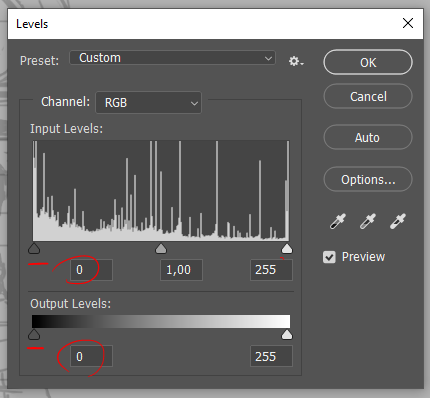
I’d need further persuasion about Adobe’s color balance adjustment tool. I’m assuming the link shows the UI that you have in mind. I don’t use Photoshop myself, and since you describe using additional adjustments to create the posted image, I’m unclear what the results of color balance look like in isolation.
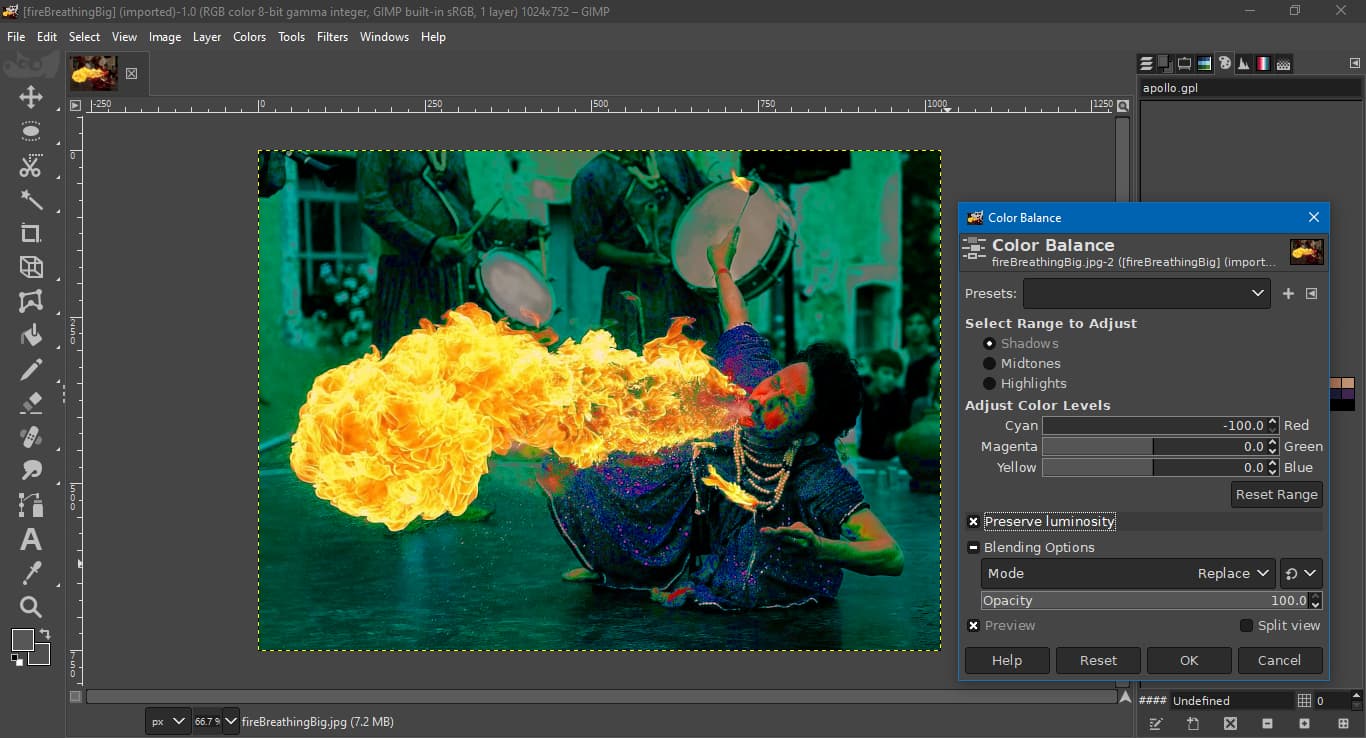
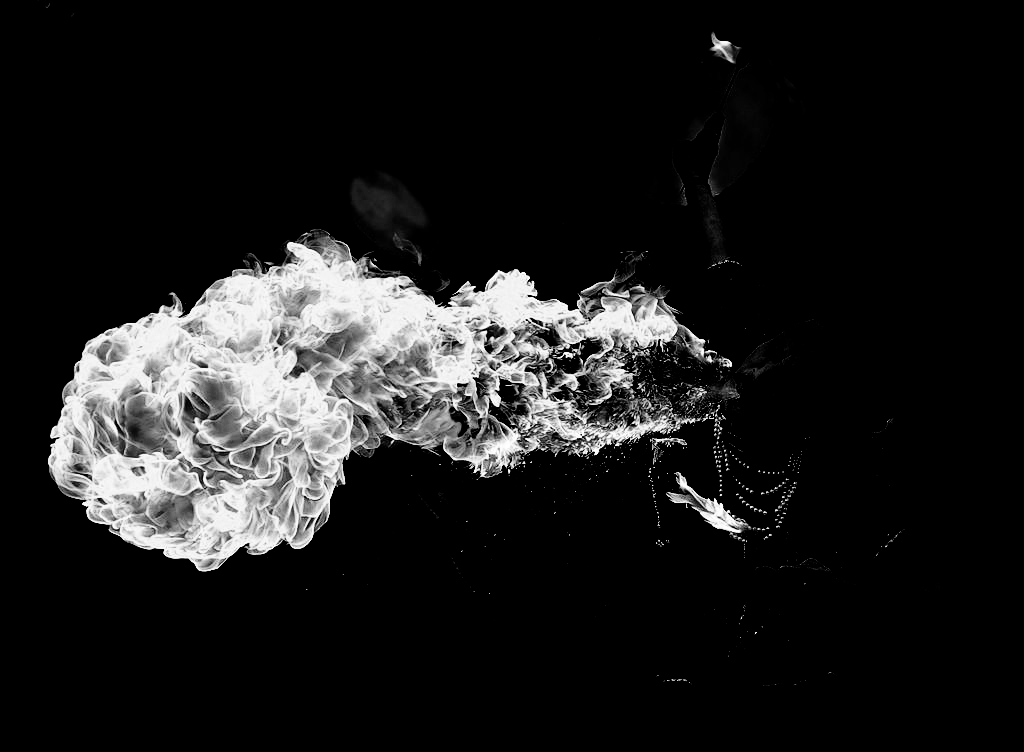
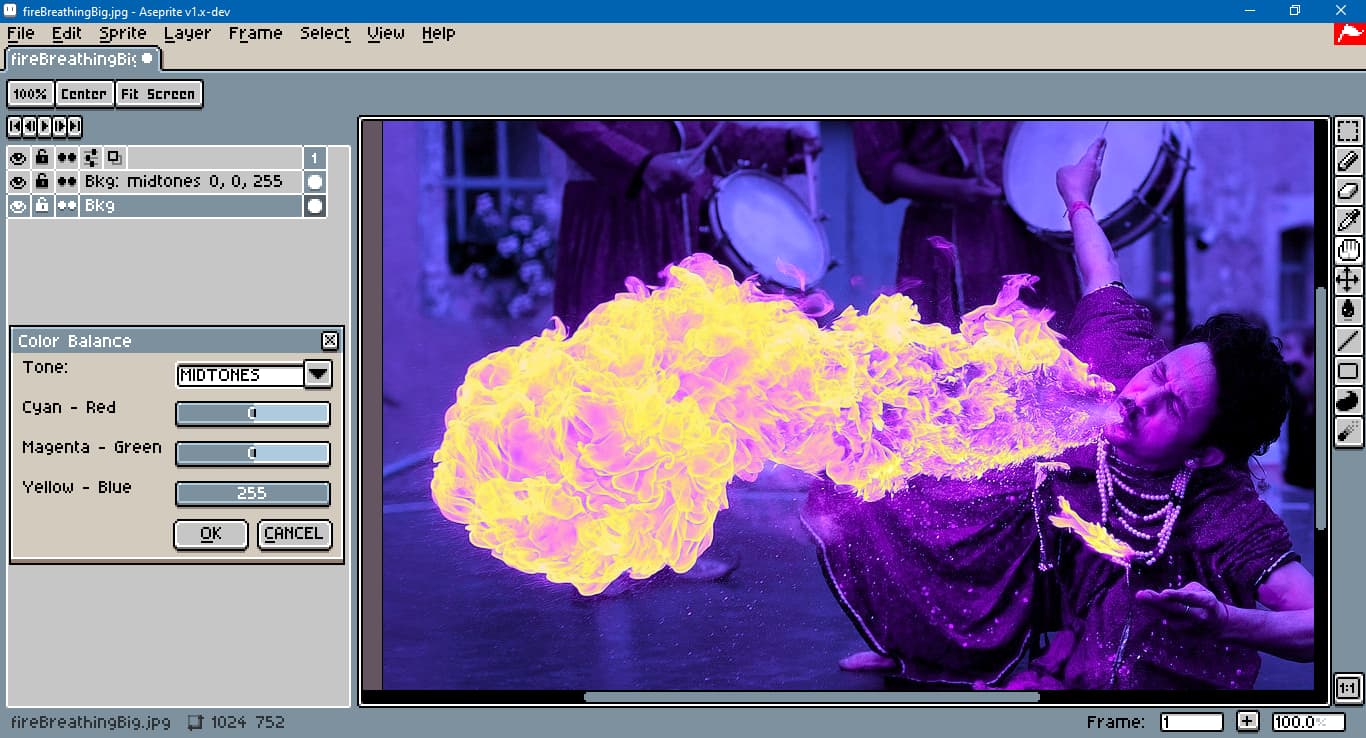
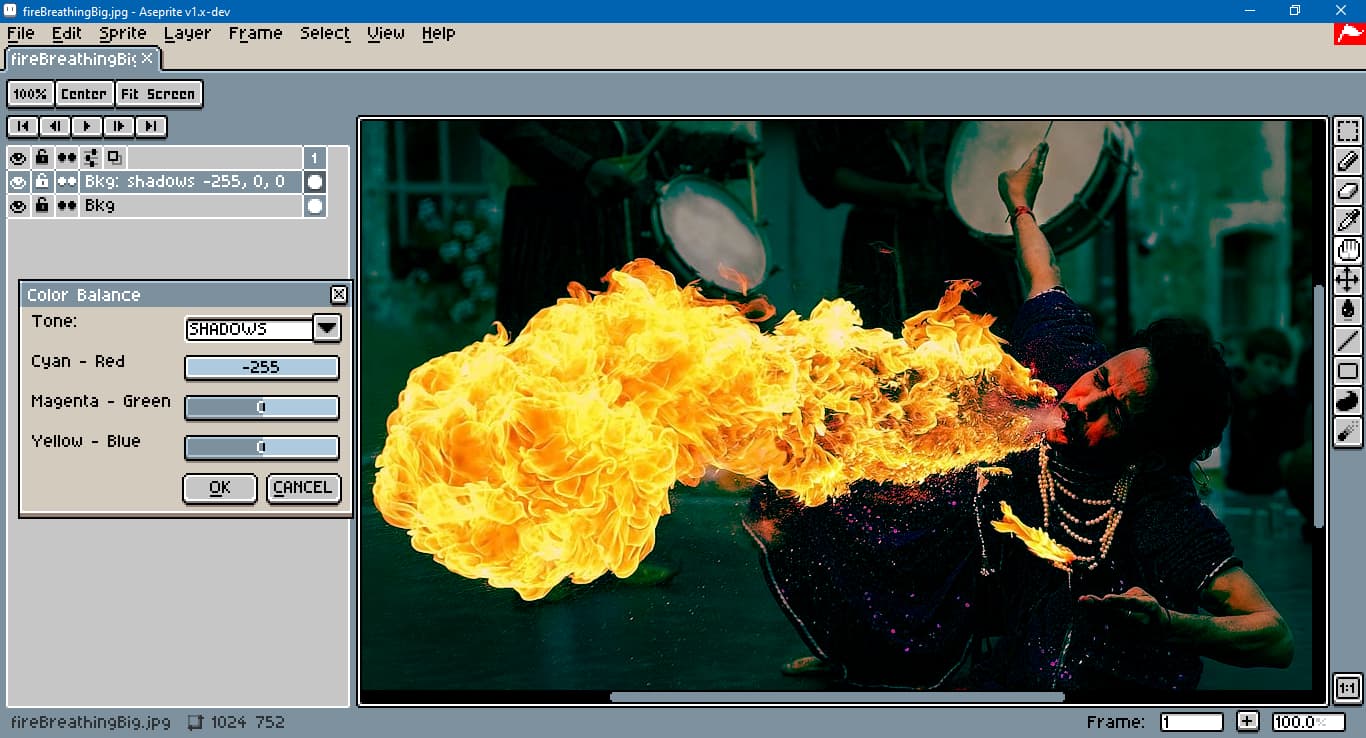
Photoshop is closed source, so the color balance tool would have to be reverse-engineered. From what I’ve tried in GIMP and Krita, and from some discussion threads on Stack Overflow, the filter often produces poor results. Using Fire breathing 2 by Luc Viatour as a test image:
I’d hazard a guess that it’s due to the code using standard RGB and/or HSL. (HSL is not separate from sRGB, just a different way of representing it. It is terrible at calculating lightness. HSV is no better.)
For decent results as in Photoshop, that “Preserve Luminosity” check box probably must do a lot of work. To easily preserve luminosity, you could develop a color balance filter that operates in a perceptual color space like CIE LAB, SR LAB 2 or OK LAB. At that point, though, the cyan to red, magenta to green and yellow to blue sliders become misleading as to what the filter actually does.
I realize the term ‘misleading’ is melodramatic. To explain: In perceptual space there are usually 3 axes or 3 channels of information: lightness, green-to-magenta (positive and negative A) and blue-to-yellow (positive and negative B). The separation of lightness from hue and chroma is what makes preserving the source pixel’s lightness easy. But the distribution of hues as angles on a color wheel are different in perceptual space than in sRGB and HSL. Nor are they uniformly far apart such that they form a perfect hexagon / isometric cube.
It should go without saying why yellow shadows, cyan shadows and purple highlights pose a problem.
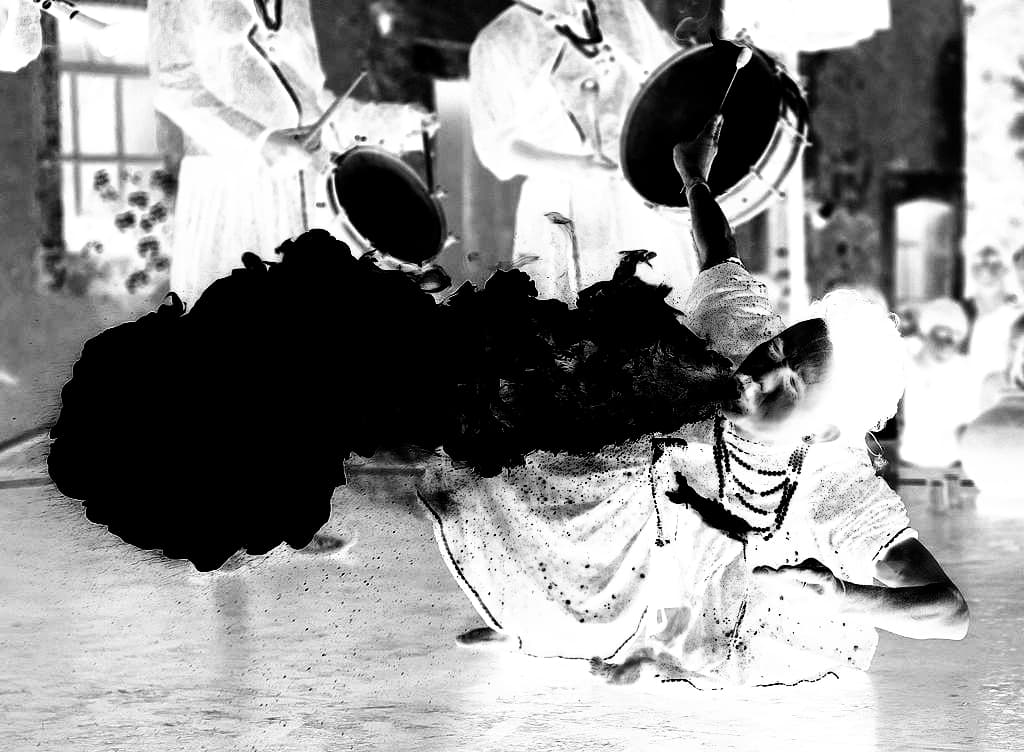
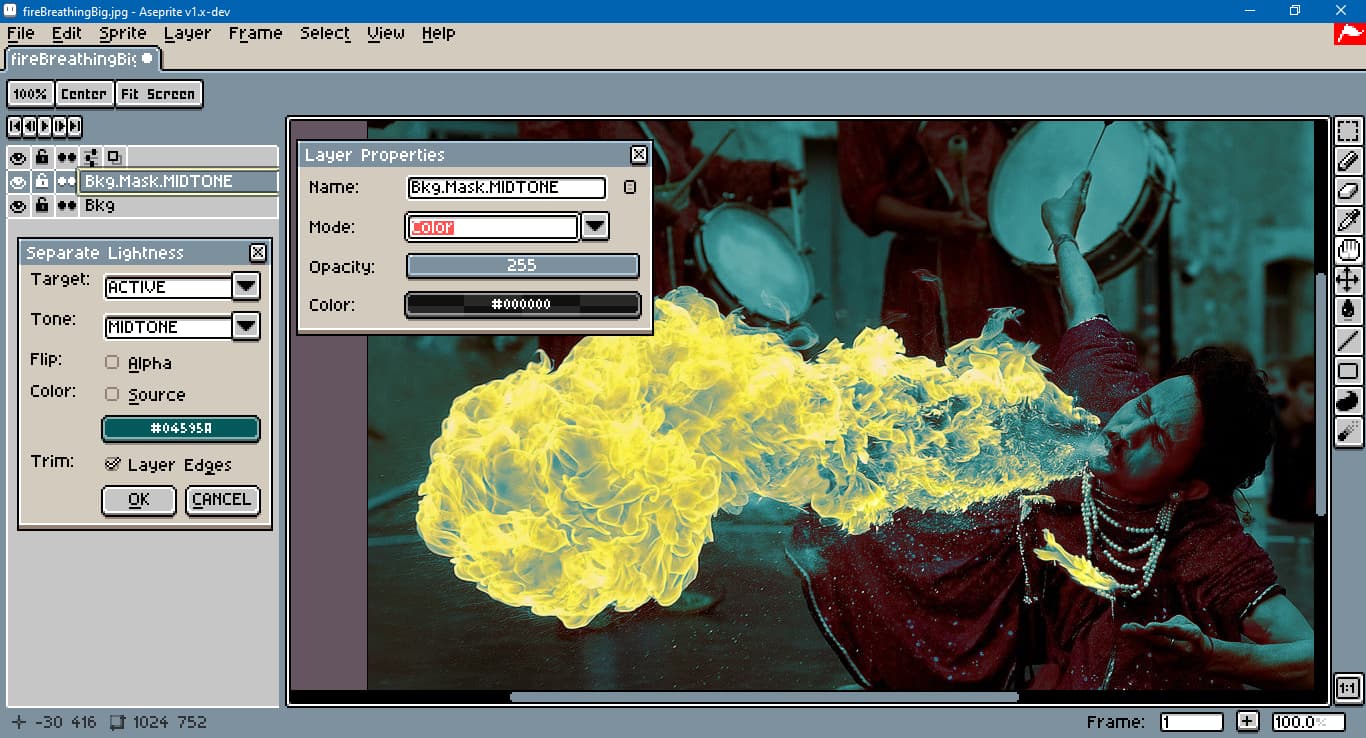
I’d be more inclined to generating simplified luminosity masks and then let the artist use them as they will. I think anything non-destructive would be cool. To show what I mean, test image masks:
 Shadows
Midtones
Highlights
I added a black background to make these easier to see, but really a color’s lightness would be transferred to the alpha channel. You could make the RGB channels any color you want, or retain the source image’s color.
Another possibility would be a tint filter that had a color in the UI rather than 3 sliders. I kinda simulated this with layer blend modes and the mask feature from above.
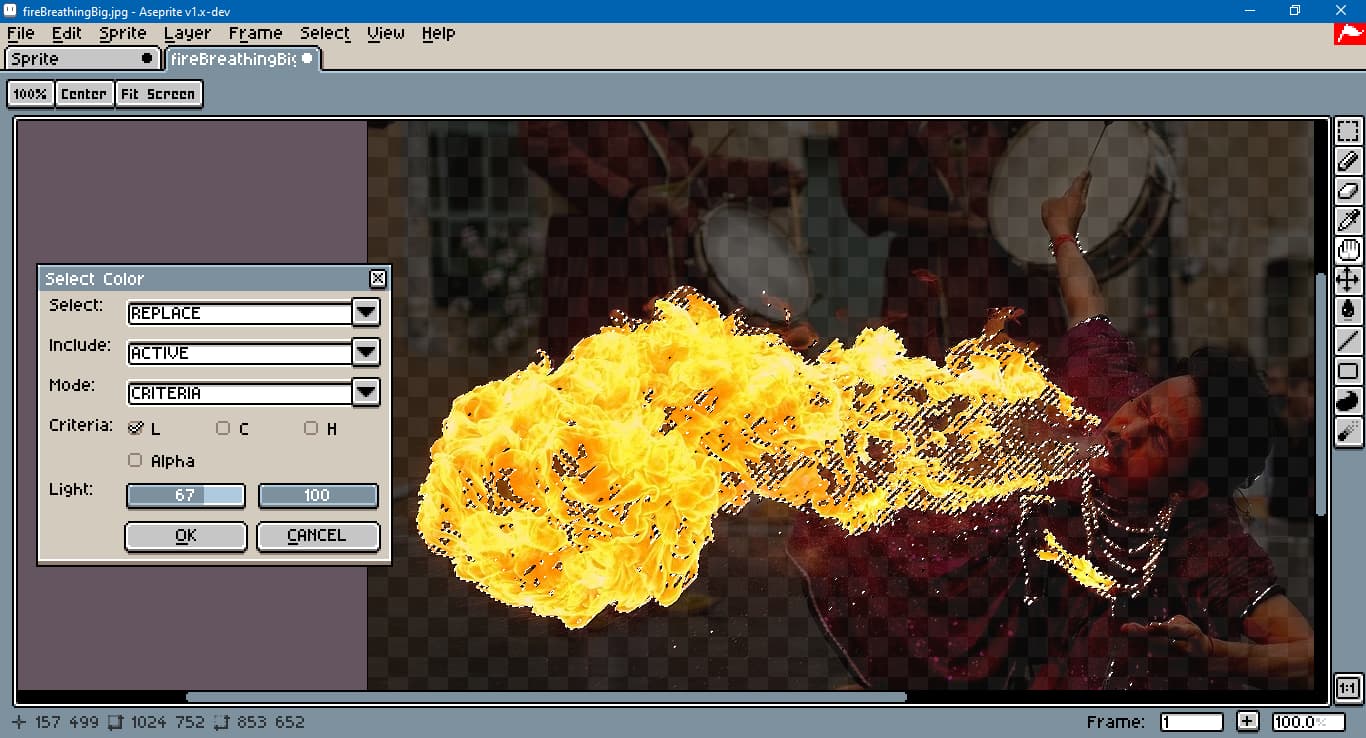
Yet another possibility, if you don’t mind a hard boundary between shadows, midtones and highlights, would be to update the Select Color tool to use criteria in addition to the default reference color. For example, to select highlights I’d choose lightness between 67% and 100%.
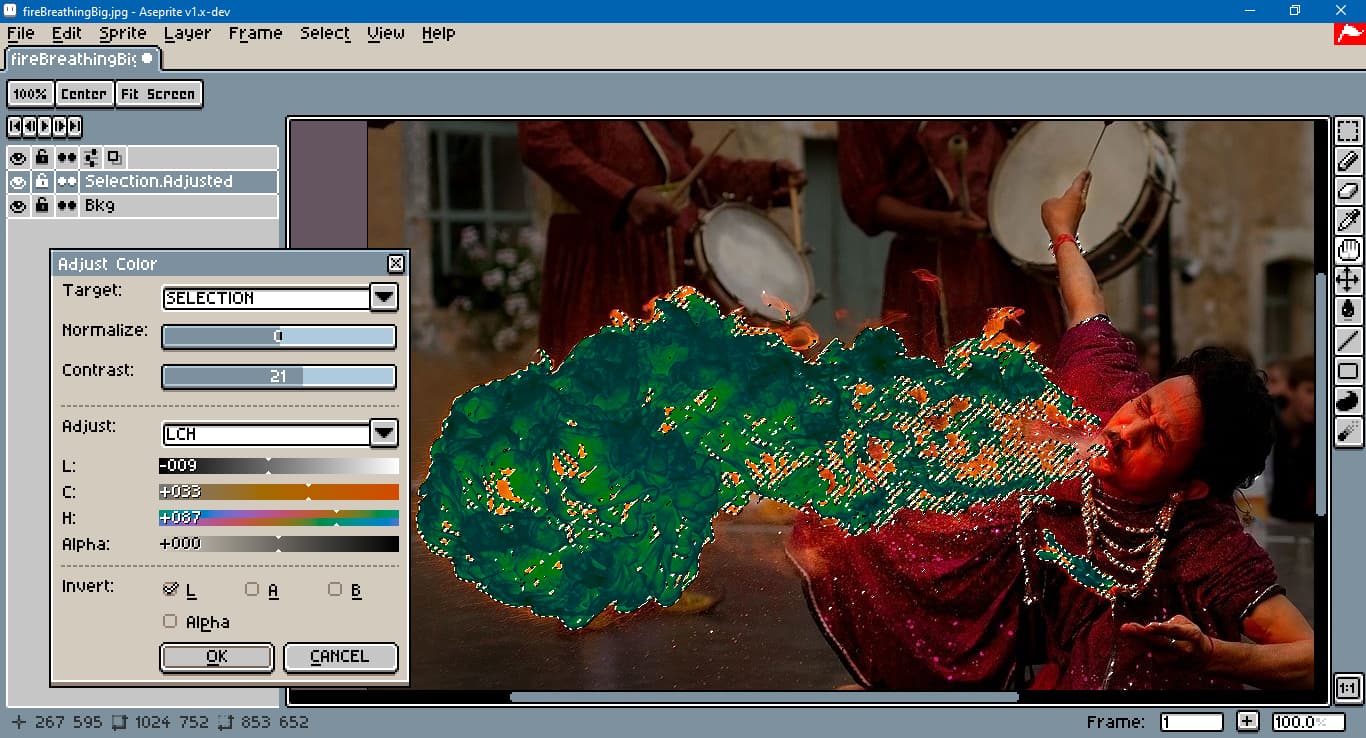
Or, since the axes L, A and B can easily be transformed into L for lightness, C for chroma and H for hue, a perceptually-based hue/saturation adjustment function might pack more punch than the traditional one. See this thread.
However, imo a filter which makes huge changes is not always good. Huge changes tend to blow out details as colors are pushed out of gamut, which makes tone mapping necessary. Tone mapping is not something I’d expect a pixel art editor working with color in [0, 255] to deal with.
Just so it doesn’t seem like I’m talking out of my rear, behind the twirly arrow is a naive prototype of a color balance filter written in Lua. I call this naive because it doesn’t support preserving luminosity and it works in linear sRGB. However, the experiments for how to target tones makes it still worth posting, imo.
Here is an example result, where the midtones are shifted to maximum blue:
and where shadows are at maximum cyan:
Naive Implementation
---@param x number
---@return number
local function fullResponse(x)
    if x <= 0.0 then return 0.0 end
    if x >= 1.0 then return 1.0 end
    return x * x * (3.0 - (x + x))
end

---@param x number
---@return number
local function shadowResponse(x)
    return fullResponse(1.0 - (x + x))
end

---@param x number
---@return number
local function midResponse(x)
    return 1.0 - fullResponse(math.abs(x + x - 1.0))
end

---@param x number
---@return number
local function lightResponse(x)
    return fullResponse(x + x - 1.0)
end

local responsePresets = {
    "FULL",
    "HIGHLIGHTS",
    "MIDTONES",
    "SHADOWS"
}

local dlg = Dialog { title = "Color Balance" }

dlg:combobox {
    id = "responsePreset",
    label = "Tone:",
    option = "MIDTONES",
    options = responsePresets
}

dlg:slider {
    id = "redShift",
    label = "Cyan - Red",
    min = -255,
    max = 255,
    value = 0
}

dlg:slider {
    id = "greenShift",
    label = "Magenta - Green",
    min = -255,
    max = 255,
    value = 0
}

dlg:slider {
    id = "blueShift",
    label = "Yellow - Blue",
    min = -255,
    max = 255,
    value = 0
}

dlg:button {
    id = "confirm",
    text = "&OK",
    onclick = function()
        local activeSprite = app.activeSprite
        if not activeSprite then
            app.alert("No active sprite.")
            return
        end

        local activeFrame = app.activeFrame
        if not activeFrame then
            app.alert("No active frame.")
            return
        end

        local activeLayer = app.activeLayer
        if not activeLayer then
            app.alert("No active layer.")
            return
        end

        local activeCel = activeLayer:cel(activeFrame)
        if not activeCel then
            app.alert("No active cel.")
            return
        end

        if activeSprite.colorMode ~= ColorMode.RGB then
            app.alert("Only RGB color mode is supported.")
            return
        end

        if activeLayer.isGroup then
            app.alert("Group layers are not supported.")
            return
        end

        local apiVersion = app.apiVersion
        if apiVersion >= 15 then
            if activeLayer.isReference then
                app.alert("Reference layers are not supported.")
                return
            end
        end

        if apiVersion >= 14 then
            if activeLayer.isTilemap then
                app.alert("Tile map layers are not supported.")
                return
            end
        end

        local args = dlg.data
        local responsePreset = args.responsePreset --[[@as string]]
        local blueShift = args.blueShift --[[@as integer]]
        local greenShift = args.greenShift --[[@as integer]]
        local redShift = args.redShift --[[@as integer]]

        ---@type fun(x: number): number
        local responseFunc = nil
        if responsePreset == "SHADOWS" then
            responseFunc = shadowResponse
        elseif responsePreset == "HIGHLIGHTS" then
            responseFunc = lightResponse
        elseif responsePreset == "MIDTONES" then
            responseFunc = midResponse
        else
            responseFunc = fullResponse
        end

        local b01Shift = blueShift / 255.0
        local g01Shift = greenShift / 255.0
        local r01Shift = redShift / 255.0

        local bShiftSign = 0
        local gShiftSign = 0
        local rShiftSign = 0

        if blueShift < 0 then
            bShiftSign = -1
        elseif blueShift > 0 then
            bShiftSign = 1
        end

        if greenShift < 0 then
            gShiftSign = -1
        elseif greenShift > 0 then
            gShiftSign = 1
        end

        if redShift < 0 then
            rShiftSign = -1
        elseif redShift > 0 then
            rShiftSign = 1
        end

        local bLinearShift = bShiftSign * (math.abs(b01Shift) ^ 2.2)
        local gLinearShift = gShiftSign * (math.abs(g01Shift) ^ 2.2)
        local rLinearShift = rShiftSign * (math.abs(r01Shift) ^ 2.2)

        ---@type table<integer, integer>
        local sourceToTarget = {}
        local sourceImage = activeCel.image
        local sourcePxItr = sourceImage:pixels()

        local aDecomp = app.pixelColor.rgbaA
        local bDecomp = app.pixelColor.rgbaB
        local gDecomp = app.pixelColor.rgbaG
        local rDecomp = app.pixelColor.rgbaR
        local rgbaComp = app.pixelColor.rgba
        local max = math.max
        local min = math.min
        local floor = math.floor

        for pixel in sourcePxItr do
            local hexSource = pixel()
            if not sourceToTarget[hexSource] then
                local alphaSource = aDecomp(hexSource)
                local hexTarget = 0
                if alphaSource > 0 then
                    -- Decompose color into color channels.
                    local blueSource = bDecomp(hexSource)
                    local greenSource = gDecomp(hexSource)
                    local redSource = rDecomp(hexSource)

                    -- Convert from [0, 255] to [0.0, 1.0].
                    local b01Source = blueSource / 255.0
                    local g01Source = greenSource / 255.0
                    local r01Source = redSource / 255.0

                    -- Convert from standard RGB to linear RGB.
                    local bLinearSource = b01Source ^ 2.2
                    local gLinearSource = g01Source ^ 2.2
                    local rLinearSource = r01Source ^ 2.2

                    -- Add shift to color.
                    local bLinearAdjusted = bLinearSource + bLinearShift
                    local gLinearAdjusted = gLinearSource + gLinearShift
                    local rLinearAdjusted = rLinearSource + rLinearShift

                    -- The relative luminance of a color is the same as
                    -- the y component when converted from linear to CIE XYZ.
                    local ySource = rLinearSource * 0.21264934272065
                        + gLinearSource * 0.7151691357059
                        + bLinearSource * 0.072181521573443

                    -- Use lightness as basis for mixing from original color
                    -- to adjusted color. Adjust the mixing factor based on
                    -- whether midtone, shadow or lightness are selected.
                    local fac = ySource ^ (1.0 / 2.2)
                    local t = responseFunc(fac)
                    local u = 1.0 - t

                    -- Linear interpolate from original to adjusted.
                    local bMixedLinear = u * bLinearSource + t * bLinearAdjusted
                    local gMixedLinear = u * gLinearSource + t * gLinearAdjusted
                    local rMixedLinear = u * rLinearSource + t * rLinearAdjusted

                    -- Clamp to [0.0, 1.0].
                    local bClampedLinear = min(max(bMixedLinear, 0.0), 1.0)
                    local gClampedLinear = min(max(gMixedLinear, 0.0), 1.0)
                    local rClampedLinear = min(max(rMixedLinear, 0.0), 1.0)

                    -- Convert from linear to standard RGB.
                    local bStandardTarget = bClampedLinear ^ (1.0 / 2.2)
                    local gStandardTarget = gClampedLinear ^ (1.0 / 2.2)
                    local rStandardTarget = rClampedLinear ^ (1.0 / 2.2)

                    -- Convert from [0.0, 1.0] to [0, 255].
                    local blue255 = floor(bStandardTarget * 255 + 0.5)
                    local green255 = floor(gStandardTarget * 255 + 0.5)
                    local red255 = floor(rStandardTarget * 255 + 0.5)

                    -- Compose into hexadecimal.
                    hexTarget = rgbaComp(red255, green255, blue255, alphaSource)
                end
                sourceToTarget[hexSource] = hexTarget
            end
        end

        local targetImage = sourceImage:clone()
        local targetPxItr = targetImage:pixels()
        for pixel in targetPxItr do
            pixel(sourceToTarget[pixel()])
        end

        local maskLayer = activeSprite:newLayer()
        maskLayer.parent = activeLayer.parent
        maskLayer.name = string.format(
            "%s: %s %d, %d, %d",
            activeLayer.name,
            string.lower(responsePreset),
            redShift, greenShift, blueShift)
        activeSprite:newCel(
            maskLayer,
            activeFrame,
            targetImage,
            activeCel.position)
        app.refresh()
    end }

dlg:button { id = "cancel", text = "&CANCEL" }

dlg:show { wait = false }
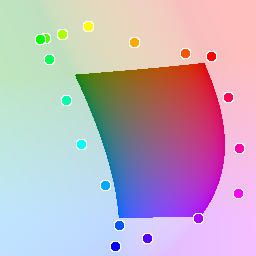
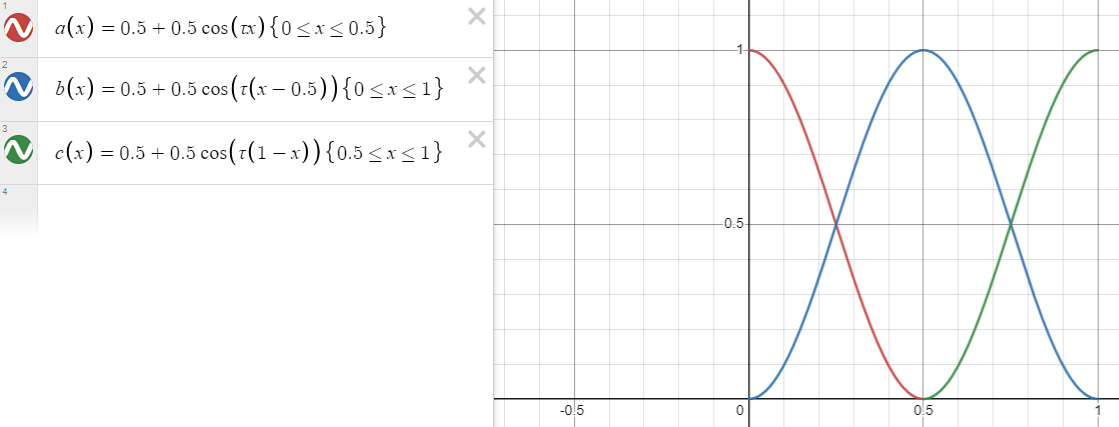
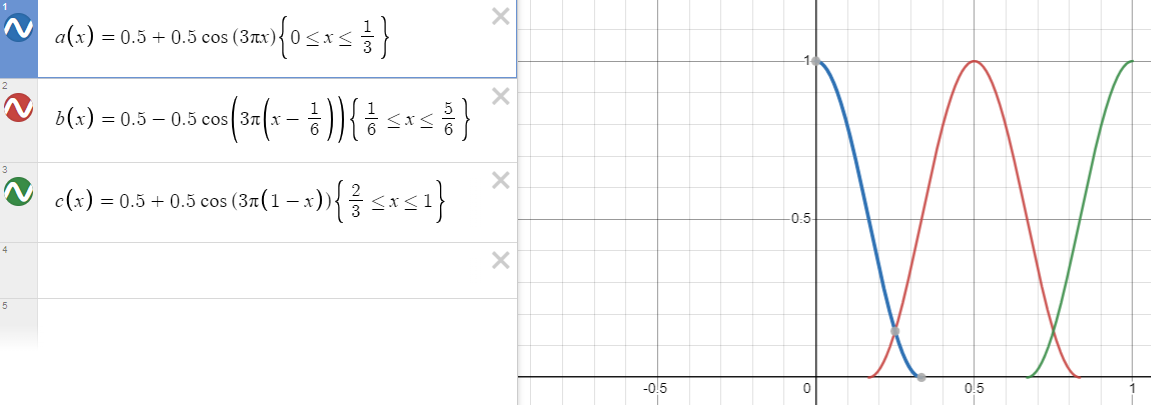
I used Desmos to figure out the response curves for shadows, midtones and highlights.
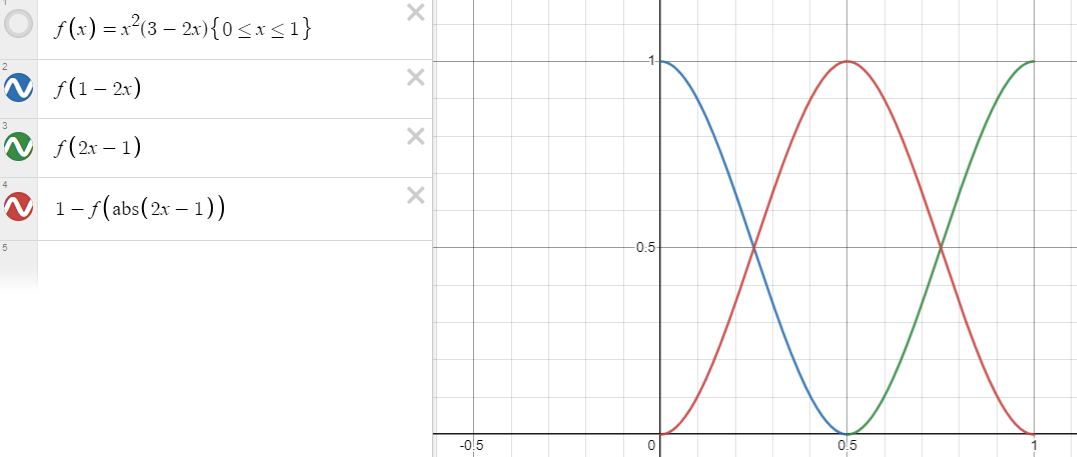
Cosines replaced with an approximation:
These curves can be narrowed if you wanted less overlap between each tone category
though I suppose in an ideal world users would have some control over these curves.
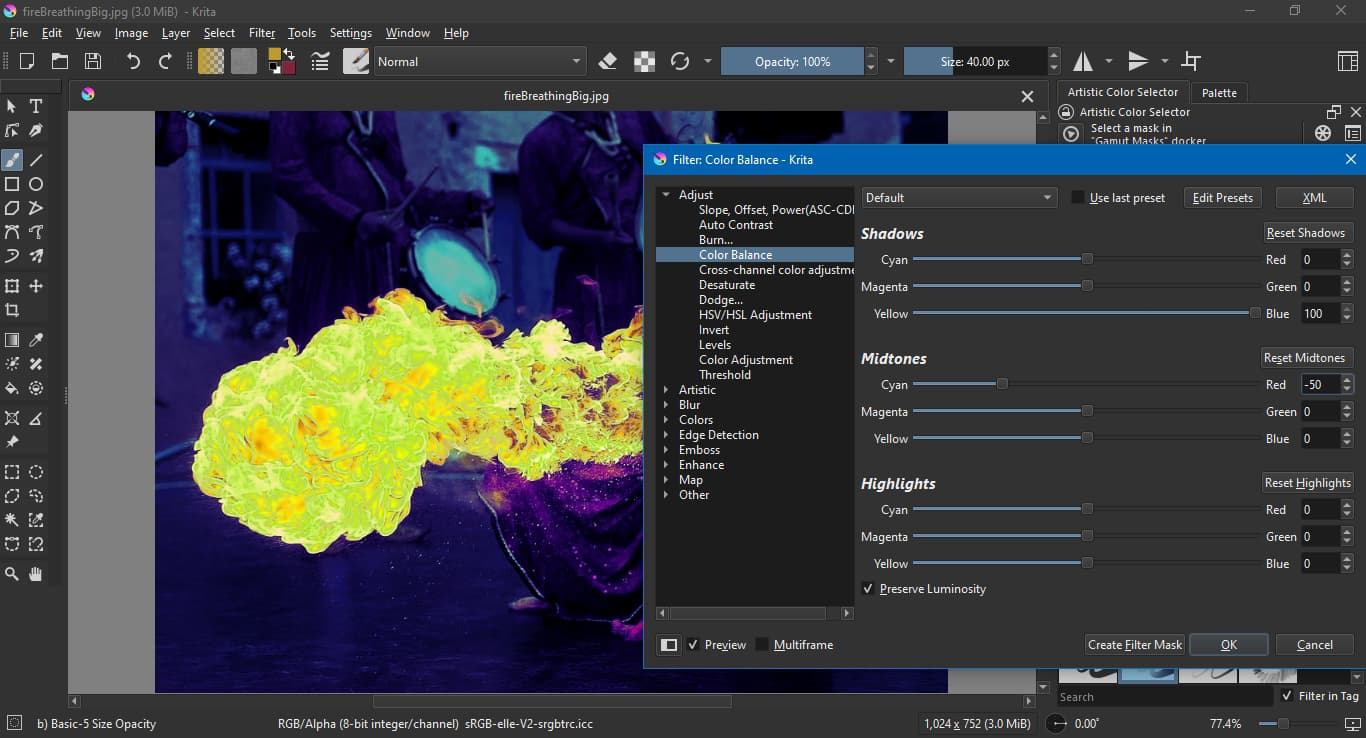
I couldn’t easily address this with the Aseprite dialog UI, but curves could also be made for the bitwise union of shadows and highlights, midtones and highlights, shadows and midtones. That would allow something vaguely akin to Krita, which has three sets of three sliders for simultaneous adjustment. I think it’s too easy to forget to, say, reset the shadows adjustment to zero before switching to midtones if only one set of three sliders is displayed at a time. But as you can see, this takes up a lot of screen space:
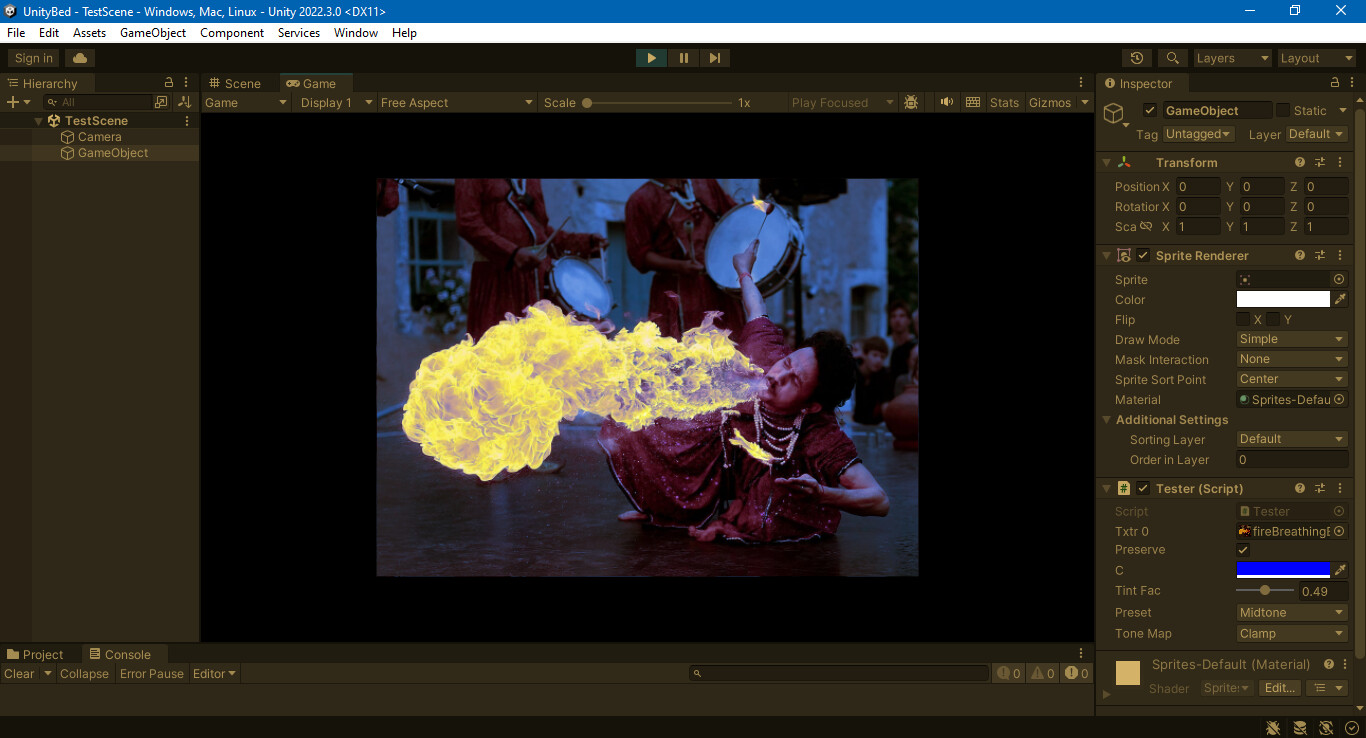
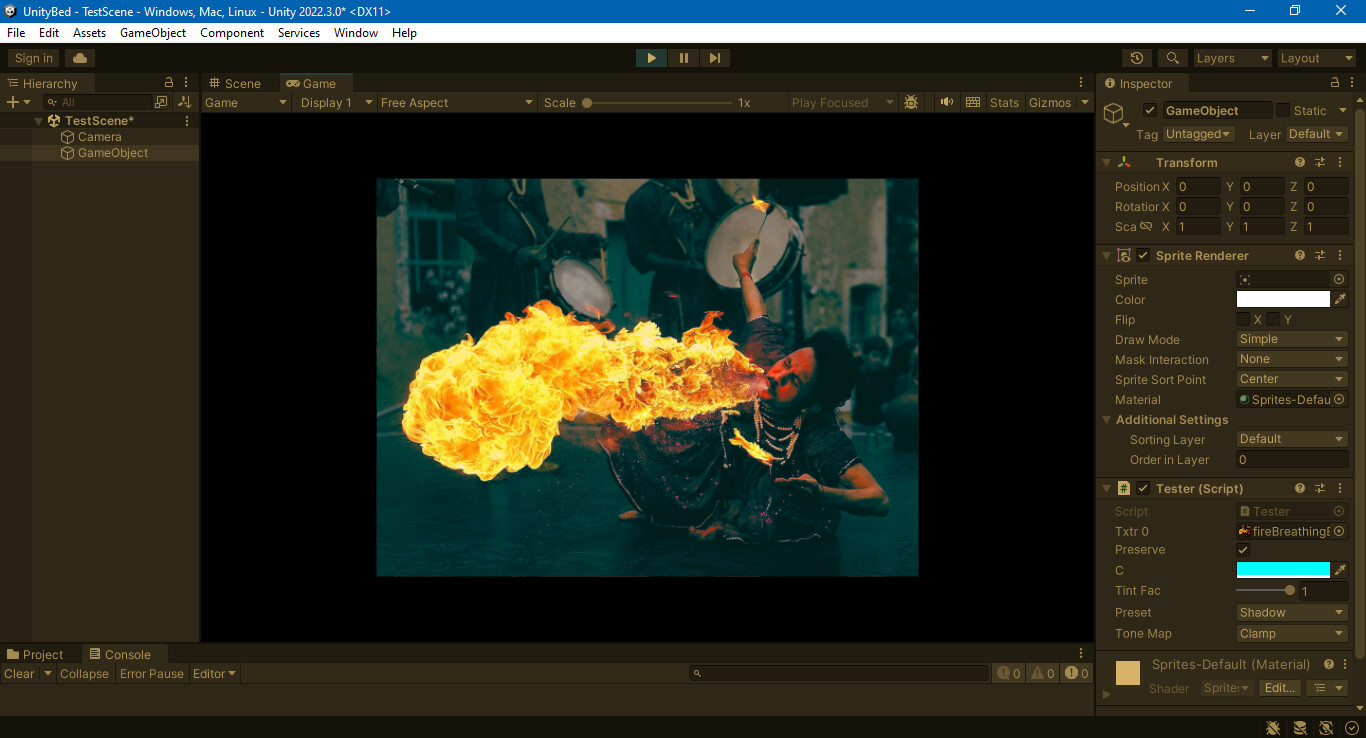
Lastly, compare the naive script with a tint in perceptual color space with preserve luminosity option implemented in C# for Unity. (Implementing as a shader would’ve been a better idea.)
Above, blue midtones, 50%.
Above, cyan shadows, 100%.
