Hi folks,
This post could fall under both the scripts and feature request category.
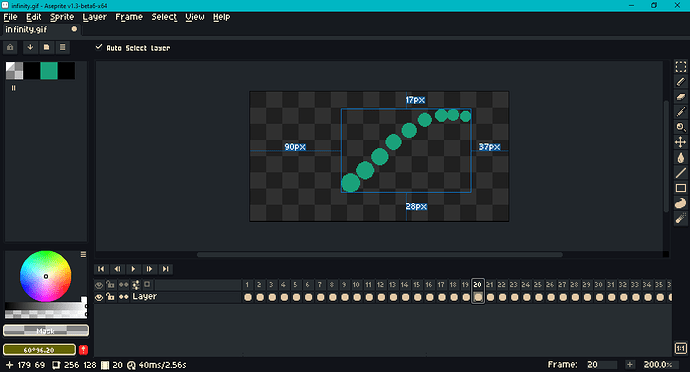
I noticed that when I import a .gif with a transparent background, for example,

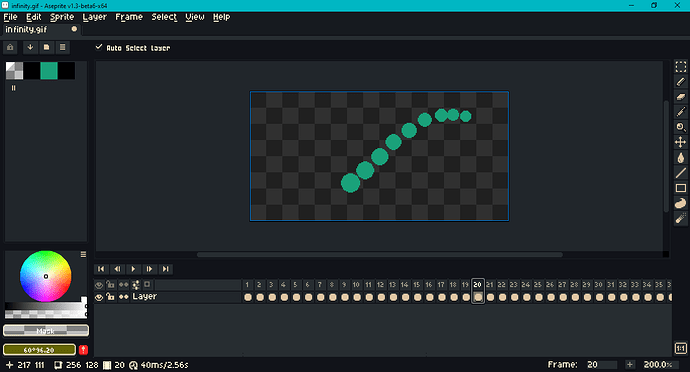
into Aseprite, the cel images (or layer edges) are not closely cropped to exclude transparent pixels. I’m using version 1.3-beta6 on Windows 10.
To show what I mean, when I hold down the Ctrl key (or go to View > Show > Layer Edges), I expect to see this:
not this:
This might not seem all that important. But any Lua script that iterates over a cel image’s pixels is performance sensitive; such scripts need to be handed as little work to do as possible.
To resolve this, I adapted code from Oleg Mikhailov on Stack Overflow to Lua. Below is the relevant excerpt from a larger file.
---Creates a copy of the image where excess
---transparent pixels have been trimmed from
---the edges. Padding is expected to be a positive
---number; it defaults to zero. Adapted from the
---Stack Overflow implementation by Oleg Mikhailov:
---https://stackoverflow.com/a/36938923 .
---
---Returns a tuple containing the cropped image,
---the top left x and top left y. The top left
---should be added to the position of the cel
---that contained the source image.
---@param image table aseprite image
---@param padding number padding
---@return table
---@return number
---@return number
function trimImage(image, padding)
    -- Immutable.
    local width = image.width
    local height = image.height
    local widthn1 = width - 1
    local heightn1 = height - 1

    -- Mutable.
    local left = 0
    local top = 0
    local right = widthn1
    local bottom = heightn1
    local minRight = widthn1
    local minBottom = heightn1

    -- Top edge.
    local breakTop = false
    while top < bottom do
        for x = 0, widthn1, 1 do
            if image:getPixel(x, top) & 0xff000000 ~= 0 then
                minRight = x
                minBottom = top
                breakTop = true
                break
            end
        end
        if breakTop then break end
        top = top + 1
    end

    -- Left edge.
    local breakLeft = false
    local topp1 = top + 1
    while left < minRight do
        for y = heightn1, topp1, -1 do
            if image:getPixel(left, y) & 0xff000000 ~= 0 then
                minBottom = y
                breakLeft = true
                break
            end
        end
        if breakLeft then break end
        left = left + 1
    end

    -- Bottom edge.
    local breakBottom = false
    while bottom > minBottom do
        for x = widthn1, left, -1 do
            if image:getPixel(x, bottom) & 0xff000000 ~= 0 then
                minRight = x
                breakBottom = true
                break
            end
        end
        if breakBottom then break end
        bottom = bottom - 1
    end

    -- Right edge.
    local breakRight = false
    while right > minRight do
        for y = bottom, top, -1 do
            if image:getPixel(right, y) & 0xff000000 ~= 0 then
                breakRight = true
                break
            end
        end
        if breakRight then break end
        right = right - 1
    end

    local valPad = padding or 0
    valPad = math.abs(valPad)

    local wTrg = 1 + right - left
    local hTrg = 1 + bottom - top
    local pad2 = valPad + valPad
    local target = Image(wTrg + pad2, hTrg + pad2)

    -- local sampleRect = Rectangle(left, top, wTrg, hTrg)
    -- local srcItr = image:pixels(sampleRect)
    -- for elm in srcItr do
    --     target:drawPixel(
    --         valPad + elm.x - left,
    --         valPad + elm.y - top,
    --         elm())
    -- end

    -- This creates a transaction.
    target:drawImage(image, Point(valPad - left, valPad - top))

    return target, left - valPad, top - valPad
end
Then I used this in the following way:
local defaults = {
    padding = 0,
    pullFocus = false
}

local dlg = Dialog { title = "Trim Image Alpha" }

dlg:slider {
    id = "padding",
    label = "Padding:",
    min = 0,
    max = 32,
    value = defaults.padding
}

dlg:newrow { always = false }

dlg:button {
    id = "confirm",
    text = "&OK",
    focus = defaults.pullFocus,
    onclick = function()
        local activeSprite = app.activeSprite
        if activeSprite then
            local args = dlg.data
            local padding = args.padding

            local oldMode = activeSprite.colorMode
            app.command.ChangePixelFormat { format = "rgb" }

            local cels = activeSprite.cels
            local celsLen = #cels
            app.transaction(function()
                for i = 1, celsLen, 1 do
                    local cel = cels[i]
                    local srcImg = cel.image
                    if srcImg then
                        local trgImg, x, y = trimImage(srcImg, padding)
                        local srcPos = cel.position
                        cel.position = Point(srcPos.x + x, srcPos.y + y)
                        cel.image = trgImg
                    end
                end
            end)

            if oldMode == ColorMode.INDEXED then
                app.command.ChangePixelFormat { format = "indexed" }
            elseif oldMode == ColorMode.GRAY then
                app.command.ChangePixelFormat { format = "gray" }
            elseif oldMode == ColorMode.RGB then
                app.command.ChangePixelFormat { format = "rgb" }
            end

            app.refresh()
        else
            app.alert("There is no active sprite.")
        end
    end
}

dlg:button {
    id = "cancel",
    text = "&CANCEL",
    onclick = function()
        dlg:close()
    end
}

dlg:show { wait = false }
If any of this was part of the GUI or scripting API and I just didn’t realize it, whoops! My bad! Feel free to disregard this post. Otherwise, on to the feature requests:
I think it’d be nice if getting a subset of an image were part of the scripting API. In other words, to replace the need for this mess:
local target = Image(trgWidth, trgHeight)
local sampleRect = Rectangle(left, top, trgWidth, trgHeight)
local srcItr = image:pixels(sampleRect)
for elm in srcItr do
    target:drawPixel(elm.x - left, elm.y - top, elm())
end
This could be a new method or could be added to existing functions like the constructor – Image(sourceImage, x, y, w, h) – or to clone – sourceImage:clone(x, y, w, h) – where x and y default to 0 and w and h default to the source image’s width and height. You could also specify the parameters as top-left x and y and bottom-right x and y.
And then secondly, the trim or crop routine above would probably be faster if done in C++, not Lua.
What I don’t know is whether it’s as important for general Aseprite users working via the GUI as it is for scripters. Do people notice or care if an imported image doesn’t have close-cropped cel images?
[Edit: Changing the canvas size with the Trim content Outside the canvas checkbox marked as true will trim a cel image smaller than sprite bounds, but it’s not exactly what I have in mind. It’s possible for a cel to have image data that extends beyond the canvas, and this data would be lost.]
[Edit 2: In the first script, I rearranged outer loops to correct for bugs when some edges of an image contained opaque pixels. I added a padding feature. Also, drawImage accepts negative positions to its first parameter, allowing it to be used as a subset function. This could be clarified in the documentation. In the second script, I added a measure to change to RGB mode from indexed mode if necessary.]
I case you wanted more motivation for why I’m posting this: I thought this thread on baking Onion Skins was a cool idea and tried writing a script for it. Using Akuma from Street Fighter Alpha 2 ( source ) as a test, I could make this well enough,
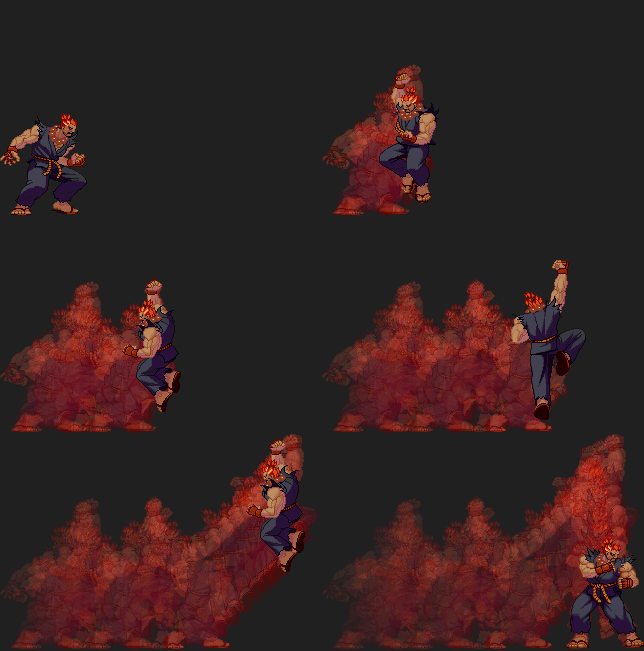
even though the script was slow. This, however, is more sophsiticated and requires a bigger refactor to make it easier to create:
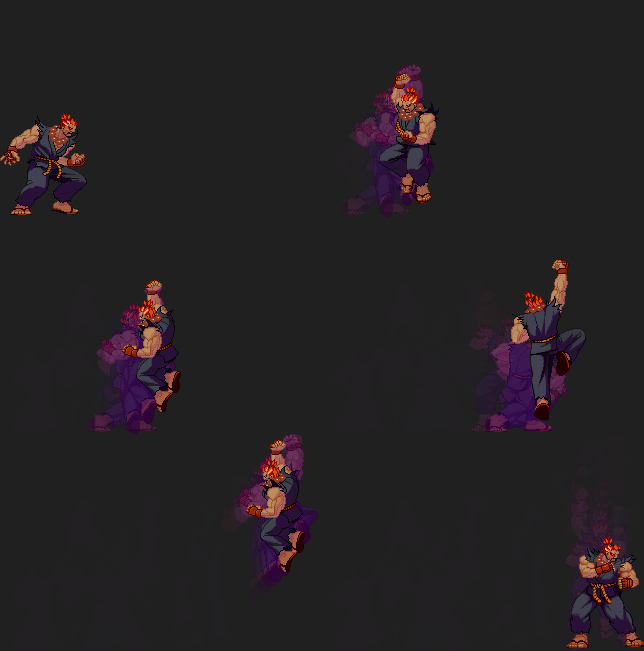
All that I wrote above about trimming cel images came about from hunting the sources of slow-down in the onion skinning script.
Thanks for reading! Have a good weekend all. 
Jeremy
